Thanks to all of you who participated in last month's challenge! The
winners of November's challenge will be announced on the 15th of December , so stay tuned!
December's Top Winner will receive 3 digital sentiments made by yours
truly, and each stamper who's card is showcased will receive 1 digital
sentiment made by yours truly! ;) Here's the best part--THE WINNERS get
to choose what they want their sentiment to say and what style! If
this doesn't sound like something you'd like, you could choose from some
sentiments that I already have made. :) More details will be forthcoming after winners are announced.
With all that taken care of, let's get to it! We've got another fabulous
challenge for you
this month at Technique Tuesday--it's Faux Tile!!! We cannot
wait to see what amazing elements your create with this tutorial! PLEASE MAKE SURE THAT YOUR CREATION USES OUR TUTORIAL OR YOUR ENTRY WILL BE DELETED. We had issues last month with a lot of people not following the rules of our challenge. It made us sad. If you need to review the rules, please consult the
tab up top!
Faux Tile
Materials Needed
 |
| Not all items used are pictured |
Cardstock
Ink
Stamps
Sponge
Paper Cutter
Embellishments, etc. to finish project
"How To"
1. Start by stamping your panel. I've decided to create a scene on 3.75" x 5" card, but any stamped images will work for this technique. Feel free to mix it up by using dark paper and light ink, too! That would be so cool!
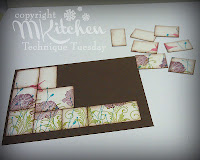
2. Cut your panel into small pieces. I started by cutting a 1" piece off the side then a piece off the bottom. I switched between side and bottom and then cut the panels into different sized pieces. Cut until you've got the amount and size of pieces you like. Make sure to put each piece of your "puzzle" back where it came from so that you don't have to try and reconfigure it from scratch later!
3. Sponge around each of your pieces with ink. I've used a neutral brown ink. Make sure to replace each piece where it belongs after you ink it--it is so much easier than just making a pile, I promise!
4. Mat the piece of your "puzzle" onto carstock and trim the cardstock as desired.
5. Add it to your project.
 |
| More info on my personal blog HERE. |
More inspiration from my crew~
Once again, PLEASE make sure to follow our rules or your entry will be deleted! And feel free to make any type of projects--it doesn't have to be a card! Happy creating! :)


