How's THAT for an alliterative title, eh? ;) Welcome back to another monthly challenge here at Technique Tuesday! Thank you to all who played along last month with Faux Pressed Flowers--the winners will be announced on the 15th of this month!
July's Top Winner will receive 3 digital sentiments made by yours
truly, and each stamper who's card is showcased will receive 1 digital
sentiment made by yours truly! ;) Here's the best part--THE WINNERS get
to choose what they want their sentiment to say and what style! If
this doesn't sound like something you'd like, you could choose from some
sentiments that I already have made. :)
This
is how it will work--please email me within 5 days with the
sentiment(s) that you would like and choose from the following styles:
classic (ie Times New Roman type font), elegant (ie cursive font),
whimsical (ie swirly/kid type font), or fun (handwriting font). More
information will be mentioned when the winners are announced!
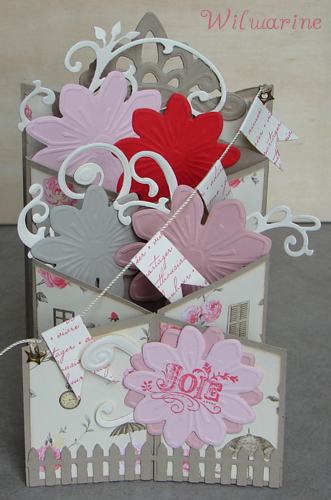
Now let's get to this month's tutorial, shall we? I'm sorry that last month stumped some of you--I hope you keep working at it until it works! This month we're going to learn a new fold. Our technique this month is called...Cascading Card.
Cascading Card
Materials Needed
1 piece of paper measuring 12"x8" (mine is double sided patterned paper)
cutting tool with scoring blade attachment
ruler
pencil
Stamps, ink, punches, etc. for decoration
"How To"
1. Lay your paper horizontally and score deeply at 2", 4", 8", and 10". Make a very light but visible score at 6".
2. Turn your card into a vertical position and mark the top at 5.5" and the bottom at 2.5". Do this lightly with a pencil so that you can erase the marks later on.
3. Place your paper onto your cutting tool and cut at an angle from the two marks you just made. It's a bit tricky--you may need to cut the last bit with scissors. If you don't want to do this with your cutting tool, you could draw a faint line from the two points and cut with scissors.
4. On each of your two pieces, mark the longer side (vertically) at 2.75" and the shorter side at 1.25".
5. Line your ruler up at an angle between these two points and make faint marks at the 2", 6", and 10" score lines.
6. Cut one piece of your paper from the slanted edge to each mark. Cut the other piece of paper from the straight edge to each mark. This will allow you to combine the two pieces to create your folded card base.
7. Accordion fold your pieces at the 2", 4", 8", and 10" scores. NOT THE 6". Trust me. You don't need to. Voice of experience, friends! ;)
8. Put your pieces together and it should be able to fold down flat.
9. Decorate as desired.
I can't wait to see your fabulous creations! Please check my rules under the rules tab above if you need more guidelines. Happy crafting!!! :)